Create a Warhol Image with opencv
In this post, I will talk about how to create a warhol image. It’s a simple experiment in image computing.
Tools
- C++
- Visual Studio 11
- opencv 2.4.9
What is A Warhol Image
The warhol image is named after Andy Warhol.
“Andy Warhol was an American artist who was a leading figure in the visual art movement known as pop art. His works explore the relationship between artistic expression, celebrity culture and advertisement that flourished by the 1960s.” –from Wikipedia
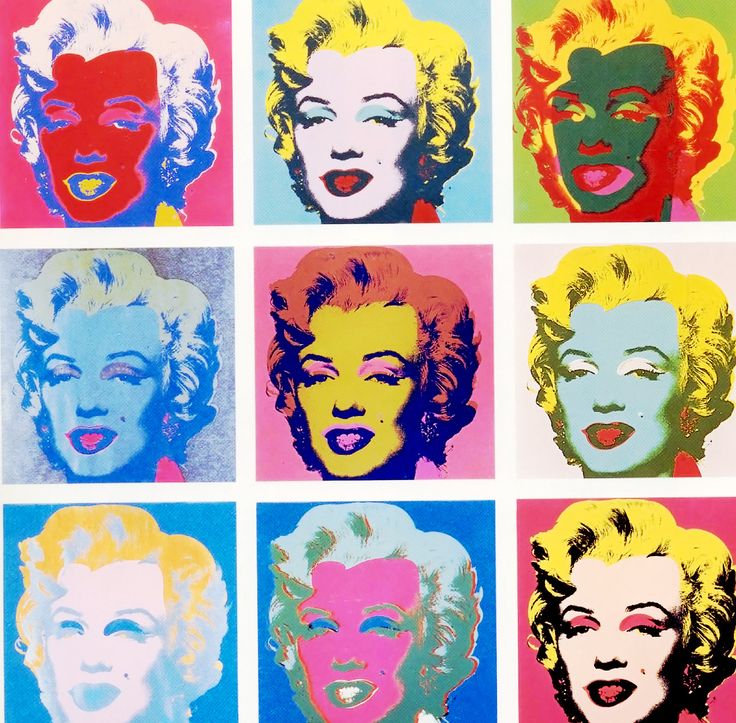
A warhol image looks like this:
Basic Idea & Methods
You can certainly find a lot of image process tools to do this, but today we are going to do this with a program written in C++. But before we get to code, there are several things you need to know.
- In computer, an image are made up of many many pixels.
- Each pixel can be represented by three values: (R,G,B). For example, a black image is made up of pixels with value 0 and a white image is made up of pixels with value 255.
- Changing the values of each pixels can change the appearance of the image
The process of the method is as follows:
- First, change source image to gray image using
cvtColor(). - Then, apply
myfilter() to filter the image. (myfilter is a method written by myself)- using two for loops to scan through the whole image
- divide all pixels into four groups [0-64, 65 -127, 128-192, 193-255] according to the intensity
- give the same group of pixels the same color
- Then, resize the filtered image into a smaller one using
resize(). - Finally, using
roi() andcopyTo() to get a 2*2 tile image.
Code
/**
    This program: Creates an Warhol-style pop art filter of
    an input image and writes it to an output image
*/

#include "stdafx.h"
#include "opencv2/core/core.hpp"
#include "opencv2/highgui/highgui.hpp"
#include "opencv2/imgproc/imgproc.hpp"
#include <iostream>

using namespace cv;
using namespace std;

/**
    @param img a color image
    @return a Warhol 2*2 image
*/

Mat myWarhol(Mat img);

/**
    @param img a gray image
    @param fltimg a filtered image
    @col four different colors to filter the image
*/

void myfilter(Mat grayimg, Mat &fltimg, int col[4][3]);

/**
    @param src source color image
    @param dst destination color image
*/

void myModification(Mat src, Mat &dst);

int main()
{
    Mat image; Mat WarholImg;
    //read image
    image = imread("example.jpg", CV_LOAD_IMAGE_COLOR);
    //call myWarhol function to filter the image
    WarholImg = myWarhol(image);
    //show image
    namedWindow( "Image View Original", 1 );
    namedWindow( "1. Warhol Image", WINDOW_AUTOSIZE );
    imshow("Image View Original", image);
    imshow("1. Warhol Image", WarholImg);
    //write image
    imwrite("myWarhol.jpg", WarholImg);
    char key = waitKey(0);
    return 0;
}

/**
	myWarhol filter
*/

Mat myWarhol(Mat img) {
    Mat grayimg, fltimg, smlimg, tileimg;
    int col1[4][3] = { {0,0,255},{0,255,0},{255,0,0},{255,255,0} };//R,G,B
    int col2[4][3] = { {0,100,255},{165,255,0},{255,0,132},{255,215,140} };
    int col3[4][3] = { {19,31,24},{76,76,76},{65,0,89},{255,125,18} };
    int col4[4][3] = { {145,132,98},{184,45,63},{25,78,125},{25,25,47} };
    //change color-image to gray-image
    cvtColor (img, grayimg, CV_BGR2GRAY);
    //filter the gray-image
    fltimg = img.clone();
    myfilter(grayimg, fltimg, col1);
    //instantiate the smaller sized image
    smlimg = img.clone();
    //resize filter-image to small-image
    Size size(img.cols/2, img.rows/2);
    resize(fltimg, smlimg, size);
    //create tileimg with zeros matrix
    tileimg = Mat::zeros(img.rows, img.cols, CV_8UC3);
    //select a rec section in tile-image
    Mat roi(tileimg, Rect(0, 0, smlimg.cols, smlimg.rows));
    //roi = Scalar(0, 0, 0);
    //copy small-image to tile-image
    smlimg.copyTo(roi);

    //repeat the process
    //2nd part
    myfilter(grayimg, fltimg, col2);
    resize(fltimg, smlimg, size);
    roi= tileimg(Rect(smlimg.cols, 0, smlimg.cols, smlimg.rows));
    smlimg.copyTo(roi);
    //3rd part
    myfilter(grayimg, fltimg, col3);
    resize(fltimg, smlimg, size);
    roi= tileimg(Rect(0, smlimg.rows, smlimg.cols, smlimg.rows));
    smlimg.copyTo(roi);
    //4th part
    myfilter(grayimg, fltimg, col4);
    resize(fltimg, smlimg, size);
    roi= tileimg(Rect(smlimg.cols, smlimg.rows, smlimg.cols, smlimg.rows));
    smlimg.copyTo(roi);
    return tileimg;
}

/**
	filter the image with four given color
*/

void myfilter(Mat grayimg, Mat &fltimg, int col[4][3]){
    //For each pixel, reassign intensity value
    for (int i = 0; i < grayimg.rows; i++){
	for (int j = 0; j < grayimg.cols; j++){
		int intensity = grayimg.at<uchar>(i,j);
		if ( intensity >= 0 && intensity <= 64) {
			//group 1
			fltimg.at<Vec3b>(i,j)[0] = col[0][2];//B
			fltimg.at<Vec3b>(i,j)[1] = col[0][1];//G
			fltimg.at<Vec3b>(i,j)[2] = col[0][0];//R
		}
		else if (intensity >=65 && intensity <=127) {
			//group 2
			fltimg.at<Vec3b>(i,j)[0] = col[1][2];//B
			fltimg.at<Vec3b>(i,j)[1] = col[1][1];//G
			fltimg.at<Vec3b>(i,j)[2] = col[1][0];//R
		}
		else if (intensity >=128 && intensity <=192) {
			//group 3
			fltimg.at<Vec3b>(i,j)[0] = col[2][2];//B
			fltimg.at<Vec3b>(i,j)[1] = col[2][1];//G
			fltimg.at<Vec3b>(i,j)[2] = col[2][0];//R
		}
		else if (intensity >=193 && intensity <=255) {
			//group 4
			fltimg.at<Vec3b>(i,j)[0] = col[3][2];//B
			fltimg.at<Vec3b>(i,j)[1] = col[3][1];//G
			fltimg.at<Vec3b>(i,j)[2] = col[3][0];//R
		}
	}
    }
}
Results & Conclusion
- openCV is a library of programming functions mainly aimed at real-time computer vision, its primary interface is in C++
- we can use imread(), imwrite(), imshow() to read, wirte, show an image
- there are several ways to grayscale an image, the normal way is to average the BGR value of each pixel
Most important of all, image processing is not as hard as you think! You can modify image from sketch provided with appropriate image knowledge and programming skill. Cheers!